
Dynamics 365 has long had the ability to populate Word templates, but not without limitations. Now with Power Automate, there is an easier way.
Microsoft Power Automate has a huge range of functionality and with the help of the native Word connector, it is possible to take a prepared Word document and populate it with data from Microsoft Dynamics 365. The main advantage of this method over using traditional Dynamics 365 templates is that the data can come from any tables that you reference in your flow and can also be combined with additional data along the way.
This tutorial will guide you through the steps required to created your customised Word document and create a multi-page report using Dynamics 365 data.
Preparation: enabling the Developer tab in Microsoft Word
A one-time step that needs to be carried out is to enable the Developer tab in Word’s ribbon. Fortunately, this step is straightforward and Microsoft have provided instructions on this for Windows and MacOS.
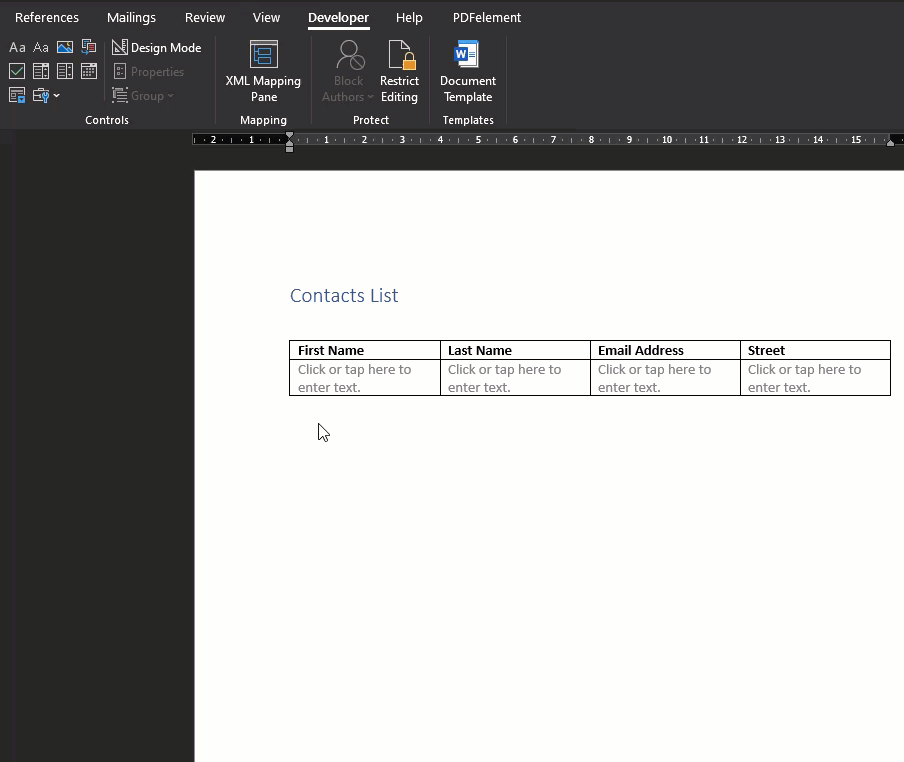
Step 1 – Create your Word document
Start a new Word document and format as required. In this example, we’re creating a simple table of contact information:

We will be using repeating rows to populate the table within the document, so we only need to create one blank row for now
Step 2 – Add your placeholder references
For each field you want to populate, you will need to add a placeholder reference via the Developer tab (1 in the screenshot below):

Under Controls (2 in the screenshot), you can see the available types (in most cases, you will want to use the Plain Text Content Control). Click on the required type to insert it into your table. Once entered, select it in your document and click Properties (3 in the screenshot)

Enter a name of your choosing in the ‘Title’ box and click OK. We would recommend keeping this simple – lower case with no spaces.
Step 3 – Adding a repeating row
Once all your fields are in place and with their titles set, you will need to select the whole row and add a Repeating Section Content Control, as seen below:
Step 4 – Uploading your Word document
Now that the Word document is ready, we need to upload it so that it can be accessed by Power Automate. The simplest place for this would be OneDrive for Business, but SharePoint is another straightforward option too.
Step 5 – Creating your Power Automate Flow
We are now ready to create the flow to populate your template with data from Dynamics 365. Head over to make.powerapps.com to begin creating your flow, either from the Flows option in the menu or creating the Flow from with in a Solution. In this tutorial, we have kept things simple, with the flow being triggered manually and listing all contacts:
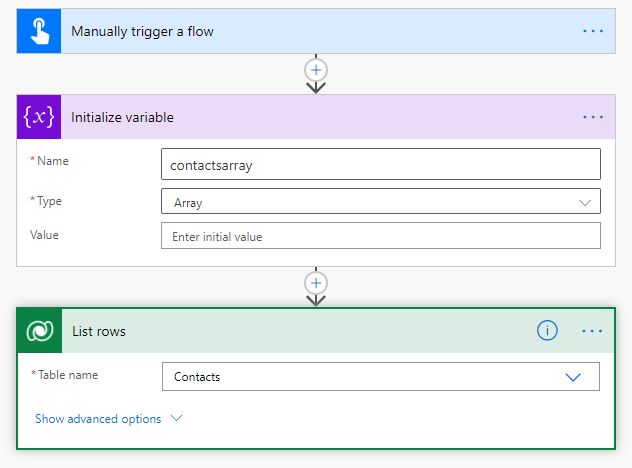
The key part to note is the initialisation of an empty array that we will later be populating with Dynamics data.
Next, add an Append To Array Variable action, select your array variable initialised earlier and enter your text as below:
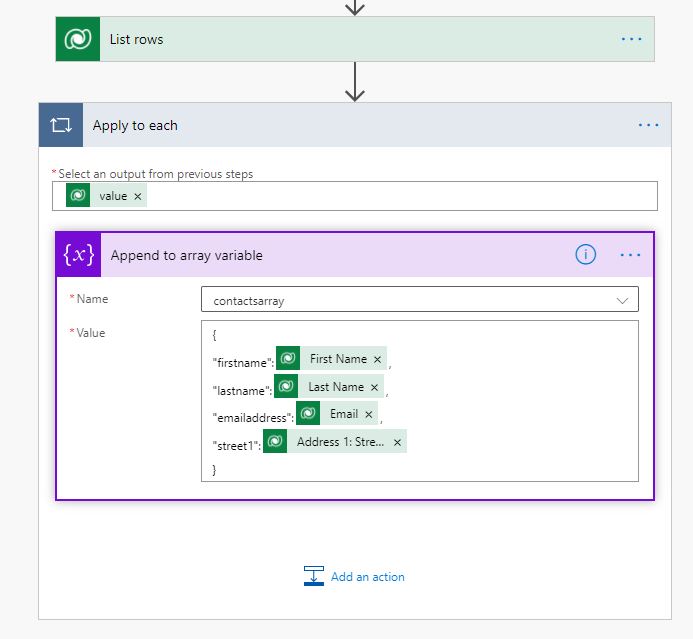
You will note that as soon as you add the first field (First Name in our example), an Apply To Each loop is automatically created for you; this enables your Flow to automatically loop through all of the records found in your List Records action. Ensure that ‘Value’ text is entered carefully in the same format as above or the editor will present you with an error.
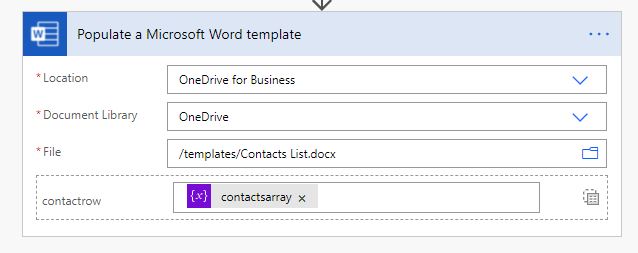
Step 6 – Populating your Word Document
Now that we have prepared our data, we are now ready to populate our uploaded Word Document. When you add a Populate a Microsoft Word Template action, you will be prompted to browse for the location of your file and once selected, the references you added earlier will automatically be displayed:

Although each individual reference is displayed, by clicking the Switch To Input Entire Array button, we can populate the whole row in one go using our array variable:
Step 7 – The completed Word document
With the Word document now containing data, it’s ready to be used; in our case, we are just sending a simple email with the Word file as an attachment:

And as you can see, the received document is now populated with all the requested Contact data:

Summary
As you can see, with a few straightforward steps, Word documents can be created that can be populated with your Dynamics 365 data. Once a Word file has been created, amendments to this file can easily be made and the original file overwritten, making it much easier to maintain than a traditional Dynamics 365 template. For more complex reports that require more intensive data shaping prior to document generation, then Power BI Paginated Reports would be the logical choice.
Related: – Populating an Excel table with Power Automate & Microsoft Graph and other Power Automate Examples.
If you are an existing Strategy 365 client and wish to discuss how the above functionality can assist your business, get in touch with one of our experts today.
